All posts by ManuelGR

Microsoft Dynamics 365 Customer Engagement Consultant Speciality: Field Service

Work Order fields explained

Total Estimated Duration

Sum of all estimated durations coming from Work Order Incidents or Work Order Service Tasks.

First Arrived On

when the first technician arrived onsite / switched the status of a booking to In Progress. It looks at the Actual Arrival Time field of the Booking even if this Arrival Time got updated later.

If Bookings aren’t used the field can be updated manually.

Completed On

when the last booking was completed. If there are more than one bookings it should be the latest of all the bookings.

It looks at the End Time of the Booking combined with the Booking Status Completed.

If Bookings aren’t used the field can be updated manually. For example if you have subcontractors providing their data differently that through the Microsoft apps.

Closed On

When the System Status of the Work Order was switched to Closed – Posted.

System Status

This field should never be customized as it drived the whole Field Service process and has many implications and automatically triggering lots of Microsoft plugins..

System Status Posted

If you switch the System Status to Posted (formerly “Closed – Posted”) while there are still Scheduled Bookings, they will automatically be set to ‘Booking Status’.’Field Service Booking Status’ Canceled.

While having Bookings in Status In Progress it isn’t possible to switch the Work Order to Closed – Posted or Canceled.

Instructions

The content of this field is automatically pulled (copied) from the associated ‘Service Account’.’Work Order Instructions’.

It is good for general advice related to the customer like how to enter the building or other Service Account specific information.

Reported By Contact

Can be a Contact that doesn’t belong to the Account.

Is not being filled OOB from Case.Contact.

Support Contact

Lookup to Resource.

If using Remote Assist this should be used for the remote expert a technician should call when (s)he needs remote support.

Is not being filled OOB from Case.Contact.

Primary Contact, Email, Address Phone

The Primary Contact is part of an embedded Quick View Form, so you can’t edit it directly on the Work Order unless you would embed it via a Form Component Control.

It is the Service Account’s Primary Contact.

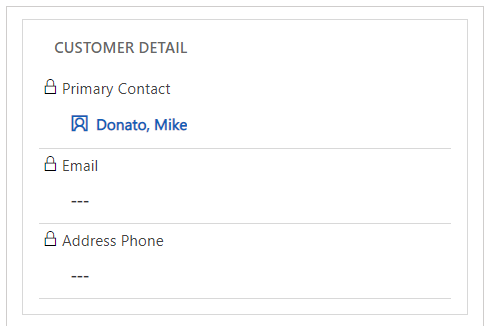
Sometimes a bit misleading are the Email and Address Phone fields in the Quick View. Those are data of the Service Account directly and not of the Primary Contact. In my opinion they could have been slightly renamed on the Quick view form to make that more transparent. Even more strange is that these fields on the Account Summary Card: Email (emailaddress1) and “Address Phone” (address1_telephone1) are per OOB installation not available on the Account form. So here is one of the “always to do customizations” [improve@microsoft] to somehow change the Quick View or at least put these fields onto the Account Form.

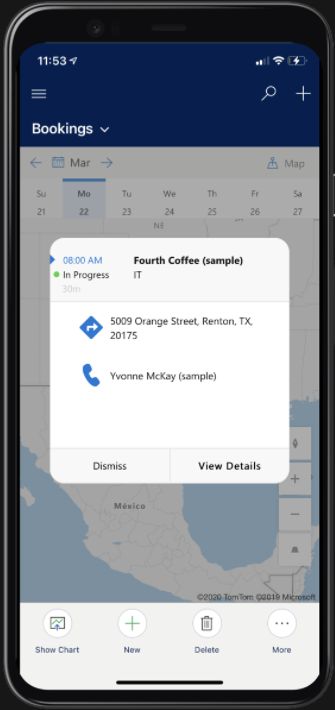
The Primary Contact of the Work Order is also used for the Info Card displayed on tap on the mobile app’s map pin:

Source: https://docs.microsoft.com/en-us/dynamics365/field-service/mobile-powerapp-booking-maps

Price List

Prices for Work Order Products and Work Order Services are pulled out of this Price List. If Products don’t have a Price List Item in this Price List, then the Product.’List Price’ is used for the Work Order.

If the Billing Account (priority 1) has an associated Product Price List, this will be auto-populated (also if the Billing Account was determined by the Service Account).

If the Billing Account has no associated Price List, the System pulls the Price List from the Work Order Type (priority 2), also if the WO Type was determined by a chosen Incident Type.

Even if the you set the WO Type first and afterwards the Billing Account, the system is setting/keeping the price list with the highest priority.

Also even if a Price List was set first and then a Billing Account, the former Price List gets overwritten.

And by the way, the same logic works on the new Get Started=>Work Order Form, even if the Billing Account Lookup isn’t visible there OOB:

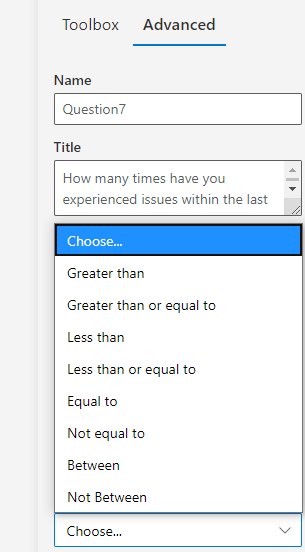
Create Incident Type

A new button in the command bar has been introduced with wave1 2021 which helps to create new Incident Types out of an existing Work Order.

Source: Microsoft, https://youtu.be/W4SKfynrjXU

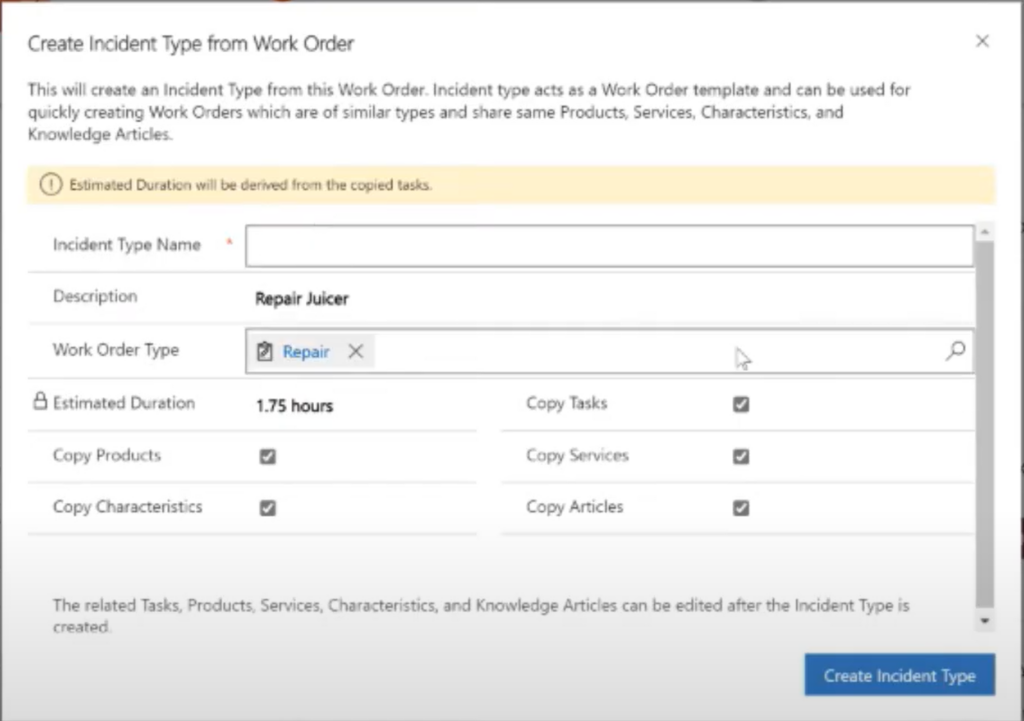
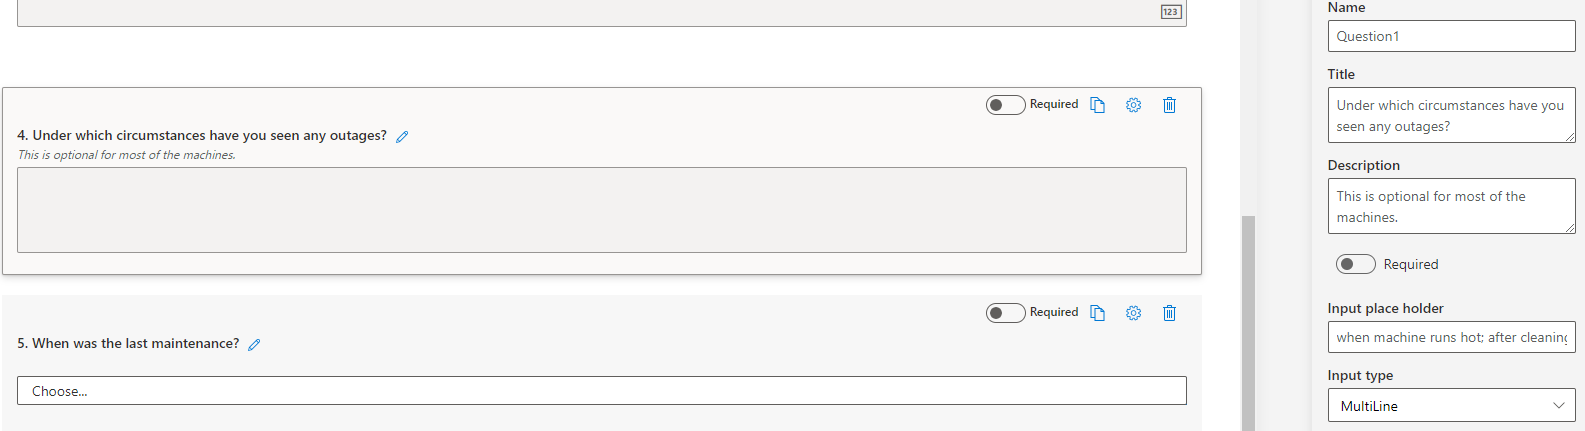
Estimated Duration can be manually adjusted by removing the tick from “Copy Tasks”:

Share it on

Where AI is used in Dynamics 365

There are already several fully integrated AI applications available for Dynamics 365 which often only need to be licensed and/or activated or even are there as part of the standard first party apps.

Dynamics 365 Customer Insights

Predict customer intent and interests by analyzing customer interactions, behavior, sentiment and demographic data. Deep insights and 360 degree view of customers.

License: 1500 USD per tenant/month (incl. 100.000 profiles)

Dynamics 365 Sales Insights as part of Dynamics 365 Sales

here you have some AI functionality included already with the standard D365 Sales license but the available features can be extended through an on top license. Bullet points are Guided Selling, Productivity Intelligence, Connection Insights, Prediction Models. Includes recommendations for Next Best Action and also Sentiment Analysis.

by Microsoft

License: 40 USD per user/month (includes 3 hours per user/month Conversation Intelligence) on top of Sales Enterprise license.

Dynamics 365 Virtual Agent for Customer Service

allows you to create chat bots which use

License: 1100 USD per tenant/month (includes 2000 sessions / 100.000 Cases)

Dynamics Customer Service Insights as part of Dynamics 365 Customer Service

provides insights in the performance of your customer service employees by natural language understanding including call analysis. It also helps finding trends, brand sentiment, historical comparison of cases and identifying most relevant support topics.

by Microsoft
Call Insights, still in Preview. Picture by Microsoft,

License: 75 USD per user/month (100.000 cases)

Dynamics 365 Fraud Protection as part of Dynamics 365 Commerce

helps e-commerce businesses to fight agains fraud by finding irregularities and identifying risks:

by Microsoft

License: 1000 USD per tenant/month (with limits on number of available transactions for Account Protection, Purchase Protection and Loss Prevention)

Additionally …

there are plenty of other AI tools which can leverage Dynamics 365 implementations in many other ways.

Especially mentioned should be the Microsoft AI Builder, which is an important tool package that provides ready made AI tools for low code / rapid implementation with D365 / CDS / Power Apps. License: 500 USD per tenant/month (1 million service credits).

Dynamics 365 Marketing also leverages some AI capabilities to

– helps author content by suggesting suitable content items

– recommends communication channels to deliver content based on customer preferencesopt

– optimizes journeys towards business goals

– proposes segments according to natural language search

More information & sources:

https://dynamics.microsoft.com/en-us/sales/overview/

https://docs.microsoft.com/en-us/dynamics365/ai/sales/overview

https://dynamics.microsoft.com/en-us/ai/virtual-agent-for-customer-service/

https://docs.microsoft.com/en-us/dynamics365/ai/customer-service-insights/overview

https://docs.microsoft.com/en-us/dynamics365/fraud-protection/overview

https://msdynamicsworld.com/story/microsoft-reveals-pricing-and-licensing-details-dynamics-365-fraud-protection

https://dynamics.microsoft.com/en-us/ai/customer-insights/

https://powerapps.microsoft.com/en-us/ai-builder/

Share it on

Microsoft Inspections

Installation

When trying to install the Preview of Microsoft’s Inspections by following this manual:

https://docs.microsoft.com/en-us/dynamics365/field-service/field-service-preview

when executing the command from Step 5:

Get-CrmFlights -ApiUrl $url -Credential $cred

I got an error explaining that the module “Microsoft.Xrm.OnlineManagementAPI” could not be loaded. At line:1 char:1.

So I executed

Set-ExecutionPolicy -ExecutionPolicy AllSigned -Scope Process
which only allows an execution of signed scripts for this one PowerShell session.

Everything else worked fine and I got these solutions in the end:

Latest Field Service Version now: 8.8.28.50. Without Preview it was 8.8.23.24

Creating an Inspection questionnaire

Apart from some other data types you can use Entity Lookups:

For Number fields you can directly set a possible number range:

Files and Photos can be attached by users:

You can upload more than one attachments to the same File type question.

I like the way how Input place holder text can be provided:

Also the Other option is great. It shows a textbox only if the Other option was chosen (available for Dropdown, Checkbox and Radiogroup):

Great Preview functionality of the questionnaire is directly available from the editor:

Logic in Inspection Questionnaire

Basic Logic like show/hide or “make required” can be implemented:

Of course you can have more than one Logic definitions:

However what immediately came to my mind was the missing possibility to evaluate data input against other CDS/CRM data.

So let’s say I want to compare a date provided by the person filling in the questionnaire whith a date that is available on a Customer Asset record that is related to the Service Task or Questionnaire, how can we do that?

My first impression is that there is not yet any possibility like that available right now. It would be great if Microsoft can provide something similar to Workflows or Calculated Fields to provide some related record data here for display as well as for validation purposes [improve@Microsoft].

Even if you want to use the provided lookup for a logic it seems like you would need to provide a GUID since there’s no lookup in the Logic editor.

Also operators like “greater that” might not make any sense when comparing records/ GUIDs. So MS still needs to exclude them from possible options here [improve@Microsoft].

Service Task

Than you create your Service Task Type containing the Inspection questionnaire:

The questionnaire even gets displayed on the Service Task Type Form.

On your Work Order Service Task you’ll get another new field “Result”:

Also see the Clear Responses button in the ribbon bar. All responses are reset/deleted by clicking it.

Also the questionnnaire is displayed here and you can directly start filling it in here in your Browser.

Entity lookup: only records where the User has privileges for are displayed. Keep in mind: only “Name”-field of related record is displayed. Would be great if in future versions it can act like an usual lookup field in D365CE [imporve@microsoft].

Once published, an Inspection can’t be unpublished and edited anymore [however this is on Microsoft’s roadmap], but from the main menues Lnspection list you can highlight and than copy the Inspection and create a new version of it this way:

Mobile

In Mobile (Field Service Mobile Power App) it would look similar to this:

(Picture by Microsoft)

Microsoft’s Inpections als work on Resco based Field Service Mobile. To use it you have to donload a new Woodford Mobile Template, see/download from here: https://docs.microsoft.com/en-us/dynamics365/field-service/inspections#perform-inspections-on-mobile

(Picture by Microsoft)

Run Power Automate Flows triggered by Inspection Responses

See here the video published by Microsoft, even if it is showing the deprecated D365 connector:

Roadmap

  • pages: allow to add your questions to an inspection “page” so that you can also skip whole pages
  • GA October 2020

Attention

According to Microsoft’s docs-article, Inspections cannot be exported and imported to other environments. Hope/expect that will improve as well [improve@Microsoft].

Sources / more information:

Articles by Dian Taylor (MVP) including Video recordings:

Manuals by Microsoft:

Installation manual (for preview version): https://docs.microsoft.com/en-us/dynamics365/field-service/field-service-preview

Comprehensive User manual including explanation of Power Automate triggered by Inspection responses: https://docs.microsoft.com/en-us/dynamics365/field-service/inspections

Share it on

Resource Pool

What I mean here by “Resource Pool” is a Bookable Resource of the Resource Type: Pool.

  1. Create a new Resource with Resource Type: Pool
  2. optional: add members to the Pool as Child Resources (entity: Bookable Resource Group)
  3. set the capacity of the Pool either
    a) manually or
    b) let it be calculated based on the member’s aggregated capacity by setting Derive Capacity From Group Members to Yes

Tip: When creating new Resource Pools and setting the field Derive Capacity From Group Members to Yes and only than start adding Child Resources to the Resource Pool, the system triggers a comprehensive and time consuming Recalculation of the Aggregation, each time after you add a new member to the Pool.
So my recommendation when configuring the Resource Pool with this flag set to Yes is, to first add all the Resource Children (Pool Members) and than in a 2nd step turn the flag to Yes.

You now should be able to see the aggregated capacity of your Pool Resource. Click on Show Work Hours on the Pool Resource’s from:

When opening one of the days for which more than one Pool members were defined, you can see the available capacity here.

Also in schedule Board you’re able to see the Pool resource this way:

The Pool Resource Cell contains the number of Pool members

If you have Resource only temporarily joining the Pool, you also see this reflected in the counter for the number of available Resources on the Pool’s Resource Cell. This counter gets recalculated each time you change the displayed date range.

Resource Pool functionalities

  • you can have Pools consisting of these three Resource Type groupings, called Pool Type:
    – Equipments
    – Facilitiies
    – Combination of [Accounts, Contacts and Users]
  • the capacity can be automatically aggregated by setting the two option set ‘Bookalble Resource’.’ Derive Capacity From Group Members‘ to Yes.
  • the skills are not automatically aggregated to the Pool level
  • you can add skills (manually of by Flow etc to the Pool Resource (parent of the Pool members)
  • if you book a Work Order to one of the Pool members directly, the available capacity of the Pool doesn’t get reduced for the duration of the Work Order
Share it on

Deprecation of Resco based Field Service Mobile App

Microsoft has announced the deprecation of the current Resco based Field Service Mobile App by June 2022.

From June 2021 on new Field Service setups have to use the new Field Service Mobile App which is fully made by Microsoft and in fact is a Model Driven App as we know it today.

The new App can be tested from Field Service Version 8.8.22.x onwards. In mobile App Stores (i.e. Google Playstore) the new app is called “Field Service Mobile (2020)” as of today.

There are some offline capabilities including sync filters already but it looks like offline logic implementation is not as easy and comprehensively possible as is it with the Resco based Field Service app. Also many other functionalities are currently missing, but Microsoft promises to catch up.

Some things that are still missing are: Push notifications, Geofencing and Location Auditing, Reporting, IoT Alerts, Remote Assist and MS Intune.

Interesting is also a new control called “Form Component Control”, which can be used to embed a Work Order form into a Booking form:

Will this be a general new feature which can be used for all other forms as well? – It looks like!

Resco will continue to evolve its Mobile Application Development Framework and will also continuously provide new features and mobile solutions. Resco already offers different mobile solutions and templates (i.e. an advanced Field Service template, Sales template, Route Planning, Inspections) that are working perfectly together with Dynamics 365 and will continue to do so after June 2022. That means by the time Microsoft catches up with current Resco technology there will be new functionality available for Users that stay with Resco as well. On the other hand also Microsoft is rapidly growing its Power Apps capabilities.

For now the direction to go would be for more sophisticated requirements and larger implementation projects Resco will probably be the better fit. For more simple / standard requirements Microsoft’s model drivel app could be worth to consider.

To sum that up – it will not be end of development for the excellent Resco Field Service mobile technology – it will rather be a separation between the Microsoft FS Mobile App and the Resco FS Mobile App. Of course we’ll eventually have to pay Resco separately if we want to use their enhanced solutions. But competition is generally good for the market and customer segmentation has always made sense.

Source and more information:

https://docs.microsoft.com/en-us/dynamics365/field-service/mobile-2020-power-platform

Share it on

Missing Field Service Mobile Push Notifications?

Just had a migration where I was blocked by not having the msdyn_FSMNotifications solution installed in my target environment.

The secret behind it: this solution can only be installed on top of Woodford.

So after you have installed Woodford you’ll need to go to the Instance Picker and click on Install (or Upgrade if available) for Field Service, even if it is already installed. This way only some additional solutions will be installed. There you go!

Sources / more information:
https://docs.microsoft.com/en-us/dynamics365/field-service/upgrade-field-service
https://docs.microsoft.com/en-us/dynamics365/field-service/mobile-push-notifications

Share it on

Losing Office Security Group when resetting an environment

If you are trying to reset an Instance/Environment, this is usually done on https://admin.powerplatform.microsoft.com/environments.

There you can click “Reset” to get the below shown dialog window.

Reset button in powerplatfrom admin portal.

In this window you have the possibility to select an Office Security Group. This field is even pre-populated with the assigned Security Group of the currently selected Instance.

So what you are expecting is that while filling in this form you can use the field “Edit Security group” to assign a Security Group to your reset Instance by choosing the Security Group in this field.

BUUUUT: nothing of this is the case. This field simply has no functionality here.

Even when you click on the lookup pen symbol next to the field so that a popup shows all of your Office Groups and you can select whatever Group you want: for your new reset Instance you’ll always have NO Security Group at all assigned.

So why has Microsoft decided to put this field on this form if it has absolutely no functionality? – Nobody knows.

Please Microsoft, fix that and don’t let us hang with the common statement “works as designed”. Because the design in this point is really more than bad.

Share it on

FS Mobile: Remove Signature from Notes

On Resco for Dynamics or Field Service Mobile Client you by default have this (in my opinion unnecessary) Signature field on every Note form.

Note Form with Signature panel

So you might ask yourself why do you need the huge Signature area on each and every Note form. Usually it should be enough to capture Notes only on Work Orders and maybe for some special (custom) forms/processes. It confuses the End User if all he wants is adding an attachment or even only a text Note.

So what you can do is removing the Signature area by a simple On Can Execute rule on the Note form:

On Can Execute Command on Note form

After you have configured this you would not see the Signature panel on a Note form anymore and also not the Signature command from the upper right burger menu of the Note form.

Note Form without Signature panel
Note menu without Signature command

You can still configure one or more Signature sections for each of your forms as you already have it OOB on the Work Order form in FS Mobile.

Add Signature Tab to a Form

  1. in Woodford, go to Entity where you want to add the Signature
  2. click “Add Media”
  3. provide Name
  4. Select “Capture Signature” and “Clear”
  5. Optional: Provide “Required for Status”. Example: Status “Approved” only possible with Signature
  6. Subject: Title of the Note

Similarly you can apply this for Photos, Videos, Files, … You could also have one Tab for Signature capturing and another Tab for Photo and/or Video capturing. Or collect multiple Signatures on one form by having different Tabs for that.

More information & sources

More details/inspirational source of how to add a Signature to a Form:
https://red365ce.wordpress.com/2015/03/10/resco-mobilecrm-adding-a-digital-signature-to-forms/

For more information about On Can Execute, which enables you to conditionally hide or show commands/buttons in the upper right corner of forms, see here:
https://www.resco.net/woodford-user-guide/#__RefHeading__5865_1627906509

Share it on

Standard Setup Tasks Field Service Mobile

Always, when I setup a new Field Service Mobile, there are some steps I go through to ensure, everything is initially working in a comfortable manner.

Surely some of the steps aren’t required but have proven to be my best practice for new instances.

  1. create Resources and ensure that they are enabled for FS Mobile
  2. install Woodford
  3. install the latest Project Template from here and make a derivate out of it in which you perform all following mobile customizations
  4. in Woodford, go to plugins and activate the most important Delete plugins: Work Order, WO Product, WO Service, WO Service Task, …
  5. in your Project Template derivate, go to Configuration and set Save Password to true

6. edit the Sync Filters to also include data from the past (1-2 weeks) for: Work Order, WO Product, WO Service Task, WO Service, WO Incident, Resource Booking.

7. switch the default Booking View Layout from Calendar to List. To do so, go to Home=>Bookable Resource Bookings=>Properties=>Properties=>Initial Control=>switch from Calendar to List

8. activate your 30-days Trial of Woodford here: https://docs.microsoft.com/en-us/dynamics365/field-service/activate-fs-mobile-app-license

Share it on

Version History FIELD SERVICE, Universal Resource Scheduling & RSO

The official docs-page from Microsoft provides information to the major releases, i.e. V. 8.6, 8.7, 8.8 and so on:

https://docs.microsoft.com/en-us/dynamics365/customer-engagement/field-service/version-history

Also the latest generally available Woodford Mobile Project Template versions incl. download links and the Woodford solution itself can be found on the site above.

However the minor update documentation is not directly linked from the above mentioned page. Therefore I (try to) list all the update announcements I come across here:

Minor Update Versions

V.8.8.3.533 (Sept. 10, 2019)
https://cloudblogs.microsoft.com/dynamics365/it/2019/09/10/enhancements-and-bug-fixes-for-field-service-version-8-8-3-533/

V.8.8.2.160 (August 11, 2019):
https://cloudblogs.microsoft.com/dynamics365/it/2019/08/11/enhancements-and-bug-fixes-for-field-service-version-8-8-2-160/

V.8.8.1.45 (July 07, 2019):
https://cloudblogs.microsoft.com/dynamics365/it/2019/07/07/enhancements-and-bug-fixes-for-field-service-version-8-8-1-45/

Field Service Mobile Updates

Mobile App V.11.3 and Project Template 1.0.2735 (September 30, 2019)
https://cloudblogs.microsoft.com/dynamics365/it/2019/09/30/release-notes-for-field-service-mobile-app-version-11-3-and-mobile-project-template-version-1-0-2735/

Universal Resource Scheduling (URS) Updates

V.3.8.0.105 (June 11, 2019)
https://cloudblogs.microsoft.com/dynamics365/it/2019/06/11/enhancements-and-bug-fixes-in-universal-resource-scheduling-urs-version-3-8-0-105/

Resource Scheduling Optimization (RSO) Updates

V.3.0.19263.1 (October 3, 2019)
https://cloudblogs.microsoft.com/dynamics365/it/2019/10/03/whats-new-in-dynamics-365-resource-scheduling-optimization-version-3-0-19263-1/

Share it on

RSO enhancements October ’19

Version 3.0.19263.1 of Resource Scheduling Optimization brings the following functionalities:

  • Constraint “Meets Resource Preferences” also respects the new Resource Preference Type “Must Choose From” to force selection from certain Resouces only
  • new Objective “As Soon As Possible”: helps to front load rather than leaving some emergency/unplanned capacity
  • new Constraint “Meets Required Roles”: matches Requirement Roles with Resource Roles
  • RSO recalculates Travel Time also for locked bookings (Operation Details: “Only the travel time was updated for the booking.”)

Source & more information:
https://cloudblogs.microsoft.com/dynamics365/it/2019/10/03/whats-new-in-dynamics-365-resource-scheduling-optimization-version-3-0-19263-1/

Share it on

Resource Preferences

Technically the entity Requirement Resource Preference serves as a container for preferred, restricted or possible Resources under
a) the Account
b) the Resource Requirement of a Work Order
c) the Resource Requirement of a Requirement Group Template

On the field Preference Type you have the options

  • Preferred
  • Restricted
  • Must choose from (new!)

What is the difference between Must choose from and Preferred?

When having Preferred Resources you will get this after having clicked Find Availability on the Schedule Board (pretty new heart symbol):

Also the Find Availability will sort show your Preferred Resources at the top of the list.
When you open the Schedule Assistant by clicking the Book-Button on the Work Order you’ll find your Preferred Resources highlighted by the same pretty heart symbol as well, however not sorted at the top of your list:

The difference to Must choose from is, that with this option the Schedule Assistant or Find Availability really only brings you these Resources back in your search results.

Share it on

Bookable Resource – Form Customization

If you try to copy the OOB Bookable Resource form you might experience that some client side scripting doesn’t seem to be applied to your copied form anymore. Even when you haven’t done ANY other customizations except of copying it.

In this case the Facility/Equipment lookup isn’t hidden anymore when choosing the Resource Type Contact. On the uncustomized form this would have been hidden.

Strange as this usually doesn’t happen, right? If you have JS references you should have copied these references as well to your new form, right?

So when you dig deeper you’re finding that there now are business rules activated for the Bookable Resource form. I think this is rather new that MS delivers Business Rules out of the box. Fine for non-coders!!

The problem seems to be that the Business Rules here are set to scope “Information” which is only the one original OOB form, so your copy of it doesn’t inherit these Business Rules.

Another fascinating thing is that when you go into the Default Solution via old Solution explorer, you’ll see three business rules (above). When using Level Up (Browser Plugin), you’ll find 6 Business Rules taking effect here:

So you would need to go to the new maker experience to find / customize all 6 of them:

Next obstacle is: you can’t just change the scope of these Business Rules (I wouldn’t even know if this would be supported or not) as at least one of them has the Managed Property “Customizable” set to Flase:

Note: trying to customize from Business Rule “Show Enabled for Field Service Mobile field if Resource Type is User]” from within the new maker experience caused for me a state of no return, at least from make.powerapps.com: the BR got Deactivated and I could neither change it nor reactivate it anymore [improve@MS]. A resolution has luckily been to reactivate it from the old solution explorer (upper screenshot).

So what are you going to do to get the same behavior as on your OOB form also for your custom Resource form?

You need to copy the Business Rules delivered by Microsoft, than edit the Scope to your custom Form and activate the copies.
In the end you would have it like this:

Share it on

Customize the Schedule Board

To customize the Schedule Board has some special limitations but also a lot of possibilities.

Requirement Lists

This is one of the most wanted things to customize.
You can easily use all different kinds of Views from the Entity Resource Requirement on the Schedule Board.

  • System views as well as Personal Views (good for advanced Users customizing their own Schedule Board tab) can be displayed.

Booking Templates

Can be defined per Schedulable Entity.

Good reference here:
https://docs.microsoft.com/en-us/dynamics365/customer-engagement/field-service/booking-template

Tooltips

  • displayed fields are defined by a View

Tooltips that are defined once across all Schedulable Entities:

  • Resource Map Pins: Resource Tooltips View
  • Organizational Unit Map Pins: Organizational Unit Tooltips View

Tooltips individual per Schedulable Entity:

  • Requirement Map Pins (here also personal view possible): Requirement Map Pin Tooltips View
  • Booking Map Pin or Booking Tile: Booking Tooltips View

Note: the Booking Tile’s Booking Tooltips View in the Daily/Weekly and Monthly View are not customizable as of now [improve@MS].

Details Pane

Sliding out from the right after selecting an item.

Views that are defined once across all Schedulable Entities:

  • Resource Map Pin or Resource Card: Resource Details View
  • Organizational Unit Map Pin: Organizational Unit Details View

Views individual per Schedulable Entity:

  • Booking Map Pin or Booking Tile: Booking Details View
  • Requirement Map Pin or Requirement from Requirements List (here also personal view possible): Requirement Details View

Map View filter

  • Requirement Map Filter View
  • Determines which Requirements (Requirement Map Pins) are shown on the map.
  • only the filter, not the columns matter
  • is independent of the Views on the Requirements Panel /Requirement Lists)
  • if Apply Territory Filter from Tab parameters (gearwheel symbol) is set to yes, ADDITIONALLY the Territories of the filter fields will be applied to sort out the displayed Requirement Map Pins

Other Adjustments

  • Increase Booking width (zoom in): slider at the bottom right. This is saved for the Schedule Board Tab (for all users).
  • remove columns from List View directly: only temporarily/local, not saved.
  • to hide certain bookings for example of Custom Entities from the Schedule Board has to be done by using the Field Service Booking Status Canceled for these Bookings and than setting this Status to be hidden.

Customization Tips

  • make default schedule board not editable per Security Role
  • if the setting for a Schedule Board Tab from 2nd gearwheel, upper right corner, should be saved, the User needs update privileges for this Schedule Board Settings entity record. Changes would be visible for all other Users of this tab as well than. More information: Shared vs. personal Schedule Board (by Microsoft).

Advanced Customization

Resource Cell

See here:
https://www.linkedin.com/pulse/extending-schedule-boardif-i-can-do-you-too-scott-lefante/

https://docs.microsoft.com/en-us/dynamics365/customer-engagement/field-service/extend-schedule-board-custom-resource-attribute

Dynamically get the displayed date range and use it for count in Resource Cell:
https://blogs.msdn.microsoft.com/crm/2017/12/15/new-use-schedule-board-date-ranges-in-custom-queries-in-universal-resource-scheduling/

Custom Tab in Details area (left)

A Web Resource can be integrated on the right as Custom Tab:
https://www.powerobjects.com/blog/2016/08/01/advanced-customizations-for-the-custom-tab-in-the-field-service-schedule-board/

Query extentions / Filter Layout extentions

https://docs.microsoft.com/en-us/dynamics365/customer-engagement/field-service/extend-schedule-board-custom-resource-attribute

https://cloudblogs.microsoft.com/dynamics365/it/2017/10/16/blog-post-july-2017-update-for-field-service-and-project-service-automation-universal-resource-scheduling-part-1/?source=crm

https://docs.microsoft.com/en-us/dynamics365/customer-engagement/common-scheduler/developer/extensibility-release-notes

Add a Sort By criteria

Get an insight into how to add a Sort By criteria by using the example of total available time. Also see how UFX works here.

https://community.dynamics.com/365/projectserviceautomation/b/dynamics-365-for-project-service-automation-blog/posts/how-to-sort-results-by-total-available-time-when-searching-for-resource-availability

https://cloudblogs.microsoft.com/dynamics365/it/2017/12/15/sort-available-resources-by-total-available-time-in-universal-resource-scheduling/

Book-Button extention

https://cloudblogs.microsoft.com/dynamics365/it/2017/07/14/dynamically-build-your-schedule-assistant-search-by-changing-the-url/

Custom Javascripts, CSS, and label localization on the Schedule Board

Create a new Client Extension record and associate it to the Schedule Board Setting record that contains your Schedule Board Tab or leave the Schedule Board Setting id field empty to have it affecting all Schedule Board Tabs .

https://community.dynamics.com/365/b/365teamblog/posts/july-2017-update-for-field-service-and-project-service-automation-universal-resource-scheduling-part-1

More information / sources:

6 tips for global versus local changes – Universal Resource Scheduling (by Microsoft)

Share it on

Mobile: Only load Customer Assets for which you have Work Orders

If you have too many Customer Assets in your Dynamics 365 database and you don’t want to have all of them offline available in your Field Service Mobile client you can set up a Sync Filter to do that.

Open Woodford=>Customer Asset and click on Sync Filter.
Than set it up like this:

Woodford Sync Filter Customer Assets

After saving the filter don’t forget to set the Incremental Linked SyncFilter (on top of the field list) to Enable:

If you want to go deeper, you can read here what this flag does:
https://www.resco.net/woodford-user-guide/#__RefHeading__5819_1627906509

Share it on