Tag Archives: Work Order

Work Order fields explained

Total Estimated Duration

Sum of all estimated durations coming from Work Order Incidents or Work Order Service Tasks.

First Arrived On

when the first technician arrived onsite / switched the status of a booking to In Progress. It looks at the Actual Arrival Time field of the Booking even if this Arrival Time got updated later.

If Bookings aren’t used the field can be updated manually.

Completed On

when the last booking was completed. If there are more than one bookings it should be the latest of all the bookings.

It looks at the End Time of the Booking combined with the Booking Status Completed.

If Bookings aren’t used the field can be updated manually. For example if you have subcontractors providing their data differently that through the Microsoft apps.

Closed On

When the System Status of the Work Order was switched to Closed – Posted.

System Status

This field should never be customized as it drived the whole Field Service process and has many implications and automatically triggering lots of Microsoft plugins..

System Status Posted

If you switch the System Status to Posted (formerly “Closed – Posted”) while there are still Scheduled Bookings, they will automatically be set to ‘Booking Status’.’Field Service Booking Status’ Canceled.

While having Bookings in Status In Progress it isn’t possible to switch the Work Order to Closed – Posted or Canceled.

Instructions

The content of this field is automatically pulled (copied) from the associated ‘Service Account’.’Work Order Instructions’.

It is good for general advice related to the customer like how to enter the building or other Service Account specific information.

Reported By Contact

Can be a Contact that doesn’t belong to the Account.

Is not being filled OOB from Case.Contact.

Support Contact

Lookup to Resource.

If using Remote Assist this should be used for the remote expert a technician should call when (s)he needs remote support.

Is not being filled OOB from Case.Contact.

Primary Contact, Email, Address Phone

The Primary Contact is part of an embedded Quick View Form, so you can’t edit it directly on the Work Order unless you would embed it via a Form Component Control.

It is the Service Account’s Primary Contact.

Sometimes a bit misleading are the Email and Address Phone fields in the Quick View. Those are data of the Service Account directly and not of the Primary Contact. In my opinion they could have been slightly renamed on the Quick view form to make that more transparent. Even more strange is that these fields on the Account Summary Card: Email (emailaddress1) and “Address Phone” (address1_telephone1) are per OOB installation not available on the Account form. So here is one of the “always to do customizations” [improve@microsoft] to somehow change the Quick View or at least put these fields onto the Account Form.

The Primary Contact of the Work Order is also used for the Info Card displayed on tap on the mobile app’s map pin:

Source: https://docs.microsoft.com/en-us/dynamics365/field-service/mobile-powerapp-booking-maps

Price List

Prices for Work Order Products and Work Order Services are pulled out of this Price List. If Products don’t have a Price List Item in this Price List, then the Product.’List Price’ is used for the Work Order.

If the Billing Account (priority 1) has an associated Product Price List, this will be auto-populated (also if the Billing Account was determined by the Service Account).

If the Billing Account has no associated Price List, the System pulls the Price List from the Work Order Type (priority 2), also if the WO Type was determined by a chosen Incident Type.

Even if the you set the WO Type first and afterwards the Billing Account, the system is setting/keeping the price list with the highest priority.

Also even if a Price List was set first and then a Billing Account, the former Price List gets overwritten.

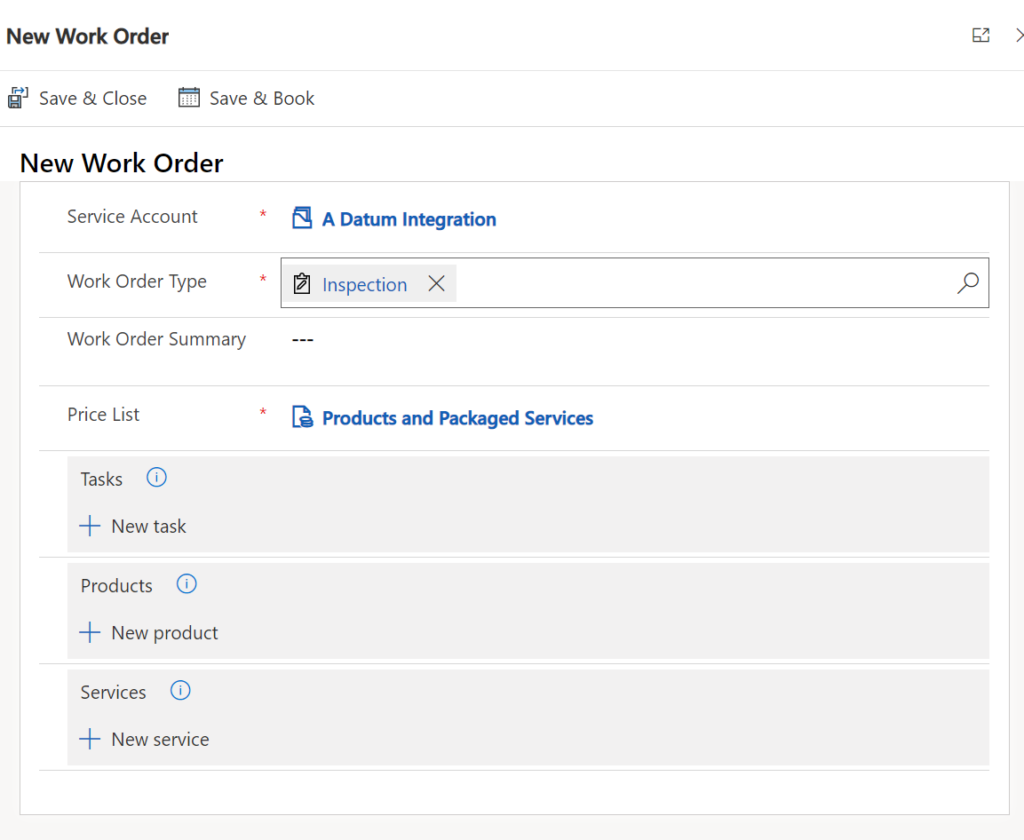
And by the way, the same logic works on the new Get Started=>Work Order Form, even if the Billing Account Lookup isn’t visible there OOB:
Create Incident Type

A new button in the command bar has been introduced with wave1 2021 which helps to create new Incident Types out of an existing Work Order.
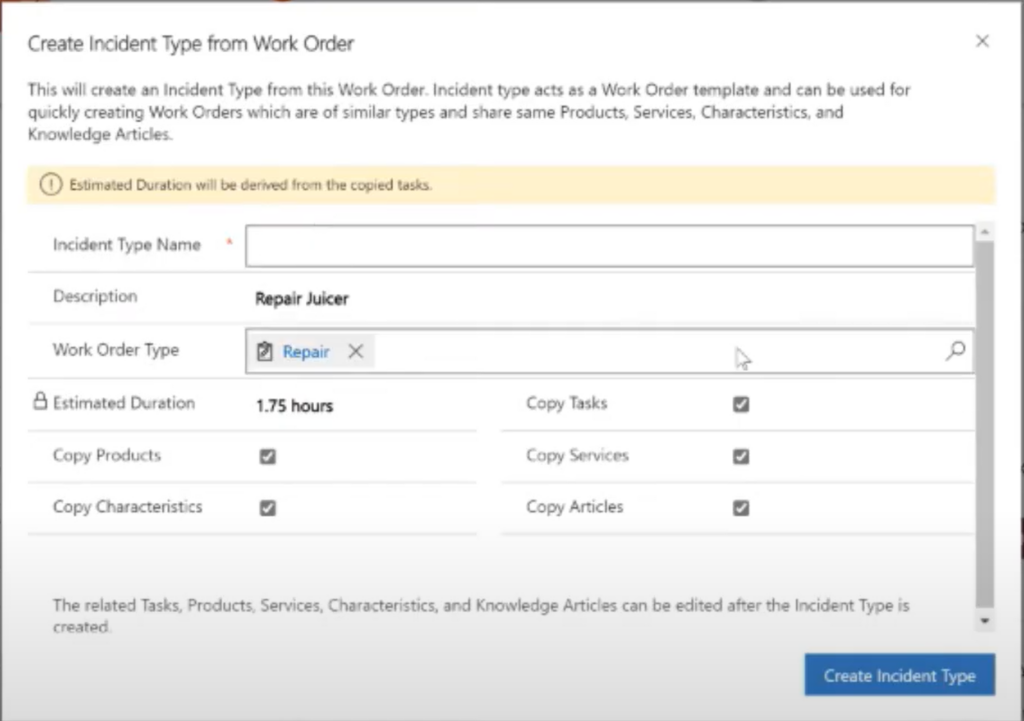
Source: Microsoft, https://youtu.be/W4SKfynrjXU

Estimated Duration can be manually adjusted by removing the tick from “Copy Tasks”:

Share it on

Requirement Groups in Work Orders

In a former article I have explained how Requirement Groups and Requirement Group Templates work.

Now I’m going to show you how these can be leveraged when using Work Orders.

Configure the Incident Type

  1. create a Requirement Group Template as explained in above mentioned article
  2. create a new Incident Type: Field Service=>Settings=>Incident Types=>”+ New”
  3. Give the new Incident Type a name (my recommendation: provide a hint in the name that helps you later on to remember that this Incident Type is based on a Requirement Group):

4. On the Incident Type form, go to Related=>Requirement Groups
5. create a new Incident Type Requirement Group:

6. associate the formerly created Requirement Group Template to it via the lookup field
7. provide a name to the record and save it.

So you should finally get something like this:

Test it with a Work Order

Now its up to you to test the whole setup.
For doing this you just need to create a new Work Order and fill in our new Incident Type into the field Primary Incident Type on the Work Order form:

Note: With a standard Field Service setup you necessarily need to provide the group based Incident Type in the field Primary Incident Type BEFORE you save the Work Order the first time. Otherwise you’ll get an error saying “You can’t add an incident that is related to a requirement group template to a work order if there is already a requirement related to this work order.”

Than you can check if your Requirements have correctly been associated with the Work Order. For doing so you need to go to: Related=>Requirements=> change the View to “Unsubmitted“:

Customized Work Order form and Requirements view

Customization recommendation (especially if you more often have group based Requirements): create your own Resource Requirement view for the Work Order form.

And now the big moment comes: hit the Book button on top of the Work Order form:

You should now get search results according to the available Resources, the distance to the Service Location and the other parameters like Work Location, Organizational Unit, Resource Type and so forth:

Note: if you are going to use the same or a similar combination of Resources more often, it makes sense to create Requirement Group Templates whereas if you need a certain combination of Resources/Skills only one time it would theoretically be enough to create a Requirement Group without a Template. However it seems like if go down that road, you will not be able to associate your Requirement Group to a Work Order anymore later on. At least I couldn’t find a way to do that. That means that if you want your Users to be able to click the Book button on a Work Order and have the fancy algorithm execute its sophisticated multi-resource query, you will always need to create an Incident Type for it first and associate a Requirement Group Template to it.

What you can do is going back from a created Work Order that has a Requirement Group associated via =>Resource Requirement=>Requirement Group (or simply from the Field Service menu: Requirement Groups) and there editing the instance of the Requirement Group that is responsible for your Work Order.
This method allows you to create a kind of a standard Incident Type Requirement Group and Template which you always use for creating a new Work Order when you want to leverage the Group functionality.

Cascading & sync of attributes within the Requirement Group

a) Cascading attribute changes from Work Order to Requirements

(as of Sept. 2019)

gets initially populated and auto-updated for the Resource Requirement with flag “Is Primary“ only:

  • Time From Promised/Time To Promised
  • Time Window Start/Time Window End
  • Service Territory (remove)

gets initially populated and auto-updated for all associated Resource Requirements:

  • Duration
  • Date Window Start/Date Window Start End (into fields From Date / To Date )
  • Latitude/Longitude
  • Work Location
  • Service Territory (Create, Change)

b) Attributes kept in sync between Resource Requirements

Duration, From/To Date, <long/Lat, Work Location are always kept in sync within the Requirement Group, even when changed on a non-primary Requirement.

Service Territory however is only kept in sync, when it was changed from the Work Order AND the change was not a removal of the field content. So you can open the non-primary Requirements and assign different Territories to each.

As an example you might end up having Requirements like this in the end:

– Time Promised From/To and Time Window Start/End is only populated to the primary Requirement
– Territory has been removed from the Work Order after initial creation: this removal is cascading only to the primary Requirement (whereas an UPDATE/CREATE of the Territory would have been cascaded to all Requirements)

When asking yourself why is there a difference of cascading between Time Promised/Time Window vs. Date Window you can come to the assumption that it has to do with the Requirement Group functionality. If we check the UI (screen below) we can easily see that there are only the From Date / To Date fields (which are the counterparts to Date Window From /To from the Work Order). So Microsoft only takes care for a synchronization of these fields within a Requirement Group but not for the other Date/Time fields.

I was asking myself how can you have differing values in the Time Promised fields for Requirements of the same Requirement Group? As soon as you are scheduling or re-scheduling them, all of the Bookings based on these Requirements get moved simultaneously.
However it could make sense if you have a scenario where a team gets a Booking for a longer period of time (i.e. traveling on site together) but the actual “ToDo” of a Resource would only be for a shorter time frame and you want to keep this information somewhere.
If you are going to use it this way you should surely not create a hard booking restriction – for example with a Real Time Workflow – which forces you to not book outside of time promised from/to.

Also note that a Time From/To Promised on one of the non-primary Requirements will be ignored completely by the Schedule Assistant. However a Time From/To Promised on the Primary Requirement is a hard selection criteria for the Schedule Assistant, even if it doesn’t show these fields in the Filter panel, when scheduling a Requirement Group [improve@MS].

Find in my next article variations of the Requirement Group setup and further detailed hints related to it.

Share it on

Overview Microsoft Field Service

The main process for Field Service spans the following entities, more or less also in this order:

  • Cases
  • Work Order
  • Work Order Incidents
  • Customer Assets
  • Resources
  • Resource Requirements
  • Resource Bookings
  • Invoices

There are over a hundred other entities around that involved in the core Field Service processes which provide additional functionality.

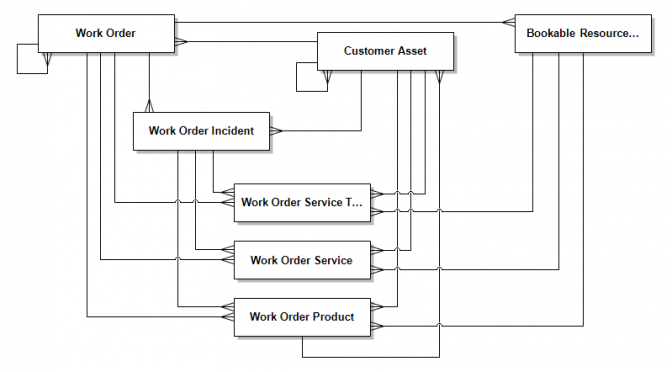
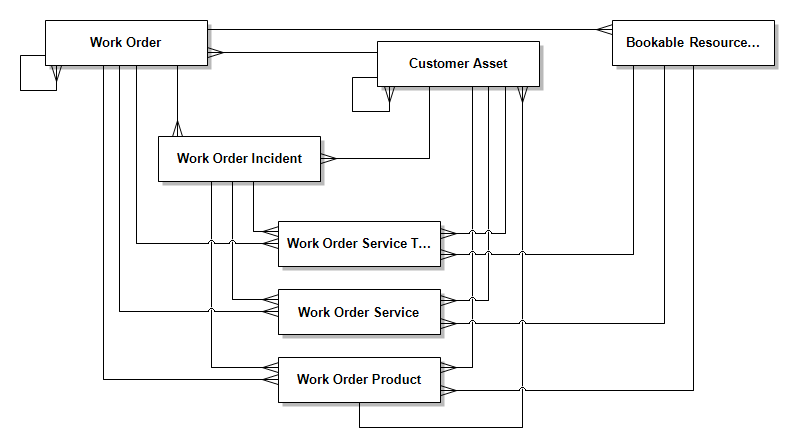
Data Model

Data model of the Work Order and its most important related entities

AddOns and extensibility solutions for D365 Field Service

Also there are plenty of Add Ons available that can extend the core Field Service functionality, like:

  • Field Service Mobile
  • Connected Field Service (now part of the core Field Service Solution)
  • PowerBI
  • Field Service (Partner) Portal
  • Data Integrator Templates
  • Microsoft Forms Pro
  • Azure IoT Hub
  • Azure IoT Central
  • Azure Stream Analytics
  • Azure Machine Learning
  • Azure Digital Twins
  • Dynamics 365 Remote Assist (for Hololens and Andoid Mobile Phone)
  • Microsoft Hololens
  • Dynamics 365 Product Visualize
  • Dynamics 365 Guides (3D instructions for Field Service Engineers)
  • Dynamics 365 Layout
  • Microsoft Intune (Mobile Device Management / Mobile Application Management)
Share it on