Category Archives: Field Service Mobile

All around the Microsoft Field Service Mobile App, and its configuration in Woodford.

Functional Location examined

  • to model out the location structure of a larger site
  • i.e. Building, Floor and Room on different levels
  • can also be used when not having a fixed location or location is frequently changing
  • Assets and Locations can easily be moved or reparented (drag n drop) if their location changes
  • Locations can be manually ordered by drag n drop
  • can be Physical or Functional location
  • available on mobile where technicians can add locations and assets
  • Address in Work Order gets updated according to the Functional Location Address, or if this is empty, the system searches across all Parents Location’s addresses (on more than one level!), and takes these if found
  • In Work Order form when first picking a Primary Incident Customer Asset, then the Functional Location gets auto-populated
  • After creating a Work Order, the Primary WO Incident will also be related to the Functional Location chosen in the WO
  • Creating a second WO Incident does NOT automatically relate the WO’s Functional Location to this 2nd WO Incident. Instead it can be manually set i.e. to another Functional Location (or create field mapping if you want it to be the same.)

Data Model of Functional Location

  • possibility to add individual address which automatically gets geo coded
  • 1:n Subgrids:
    • Customer Assets
    • Work Orders
    • Cases
    • Work Order Incidents
    • Agreement Booking Incidents
  • native N:N relationship to Account

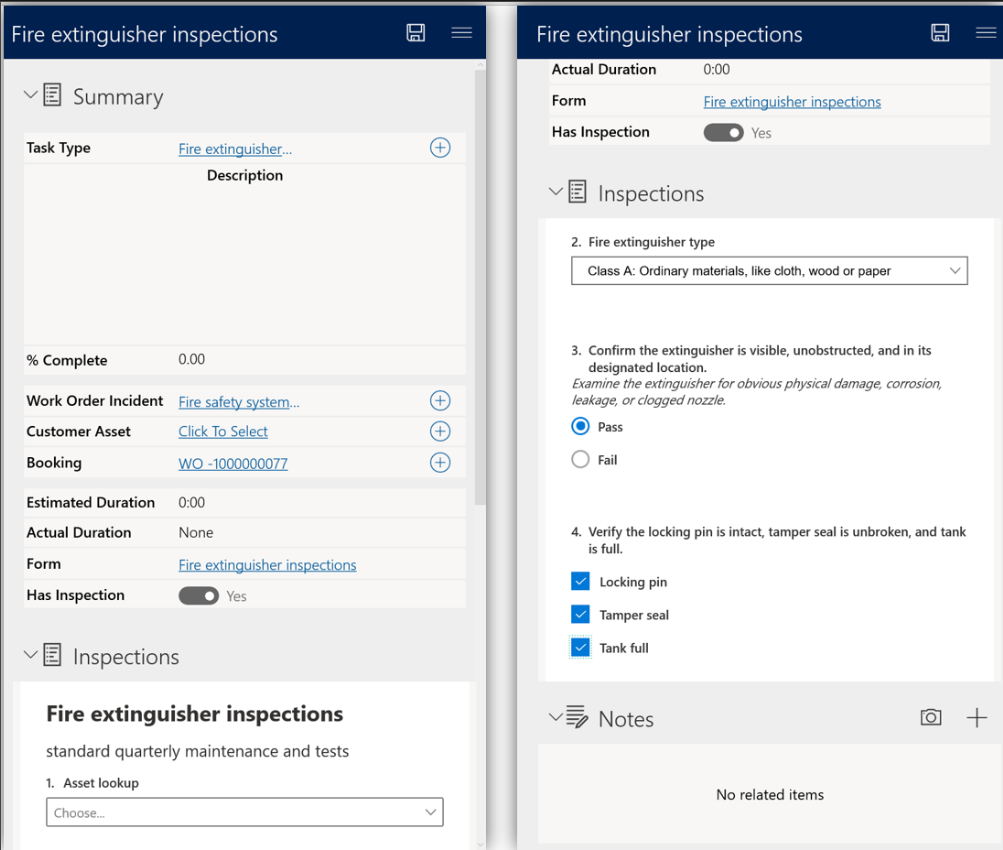
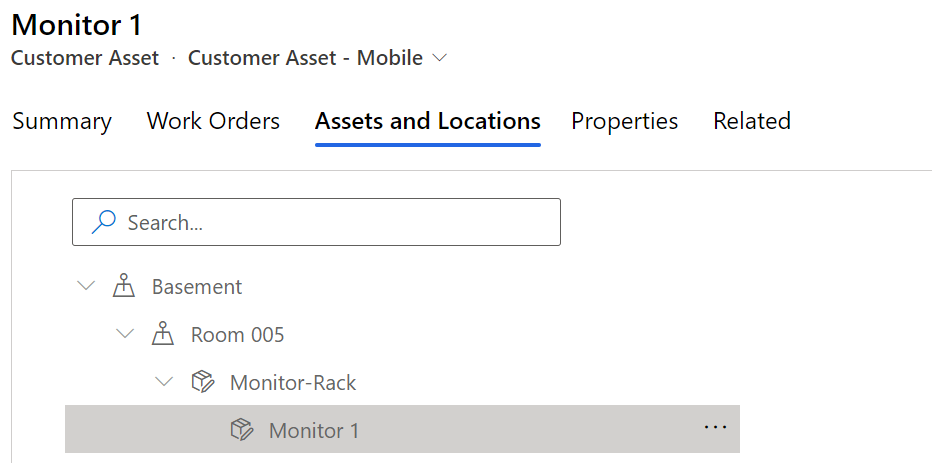
So if a User would want to track Work Order Products, WO Services, WO Service Tasks on it, the Functional Location is NOT the best table to use. This brings us to the decision that a HVAC Unit and its components like Compressor, Fan, Thermostat… are better represented as Customer Asset than as Functional Locations (see screen above and note the different symbols for Location versus Asset).

Why N:N relationship to Account?

Imagine you have a big campus and you have different Service Accounts responsible for managing Work Orders of different typesbe .

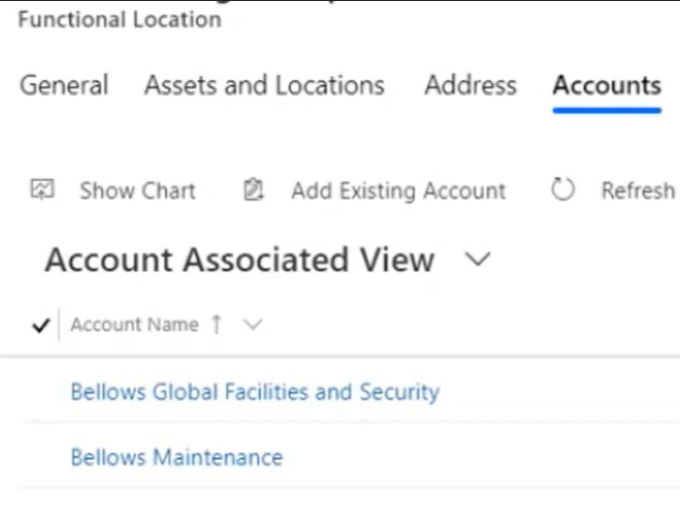
Or a big construction site with different subcontractors working on the same Functional Locations and Assets.

=> This helps to be flexible enough to have those Locations used be more than one Service Account.

To keep in mind with hierarchies and lookup prefilters here

Functional Location lookup field on Work Order

When creating a Work Order the Functional Locations are prefiltered to those of the Service Account.

Note: Creating a new Asset from the hierarchical tree view f the Account form automatically adds the Account to the created Asset.
However creating a new Functional Location from the hierarchical tree view does ONLY automatically ad the Account to the created Location if that is on the highest level directly under the Account.

When adding a Functional Location to a Work Order after the Service Account has been filled in, only those Locations are suggested by the OOB Lookup View that have the Service Account directly related or related to one of the parent Locations (also over more than one hierarchy level).
However if you’re either removing the Parent Location on the Location form or if you remove the Service Account from the N:N subgrid of the highest level Location, then your Locations won’t be found by the Functional Location Lookup view on the Work Order or Case form anymore. You would need to click Change View and then guess which Location was the one you needed.

I personally think it would be more convenient if Microsoft would automatically add the Account to all levels of Functional Location when created from Account form, as it does for the Customer Asset [improve@microsoft]. A user could still delete the Account from the N:N subgrid if not needed.

Until than it could be solved by a custom cloud flow.

Primary Incident Customer Asset lookup field on Work Order

When creating a Work Order the Primary Incident Customer Asset lookup is prefiltered by the Functional Location chosen before, but only for the Assets that are directly related to the Functional Location via ‘Customer Asset’.’Functional Location’ lookup, not for the Child Assets of such an Asset. Why? The child assets do not automatically inherit the Functional Location of the Parent Asset.

With such a setup

With the hierarchy above you wouldn’t find any Asset when chosing Basement and you would still not find Monitor 1 when chosing Room 005. However you can click Change View and remove this flag and then be able to get a list of all Assets of the Service Account:

Depending on your use cases you could surely also solve this by a custom process (Workflow/Flow) that updates the Child Asset’s Location to the Parent Asset’s Location each time there’s a change in the Asset hierarchy.

Customer Asset Form

In a Microsoft Video there is a Customer Asset Form visible in a browser that contains the new Functional Location/Asset-Hierarchy-View:

I wasn’t able to find this form in my latest OOB installation until I found out that I need the Security Role Field Service – Resource to be able to see the form Customer Asset – Mobile (below screenshot). Being “just” System Admin is not enough to get this form provided ;-).

Tip: As stated somewhere else in relation to WO Products and WO Services already, if you’re customizing Field Service, make sure to also assign yourself the other Field Service Security Roles available OOB. System Admin role does NOT provide you access to all the forms used in Field Service [improve@microsoft].

Account form

Here it is to mention that only those Assets are visible in the new hierarchy control if one of the parent Functional Locations is related to the Account AND the Top-Level Asset (aka Master Asset) belongs to the Account.

This could also be a little bit improved [improve@microsoft] so that also Asset Hierarchies/Assets are visible that have no Functional Location related to the Account but where only one of the parent assets or at least the Asset itself is related to the Account.

So if you use this feature on the Account form make sure to always add your Functional Locations to all necessary Accounts (n:n) and remember that Assets only show up on the Account form if the Master Asset belongs to the account.

Also remember, that on the Asset Form you might get a better overview of how the Asset in embedded in the Location/Asset structure.

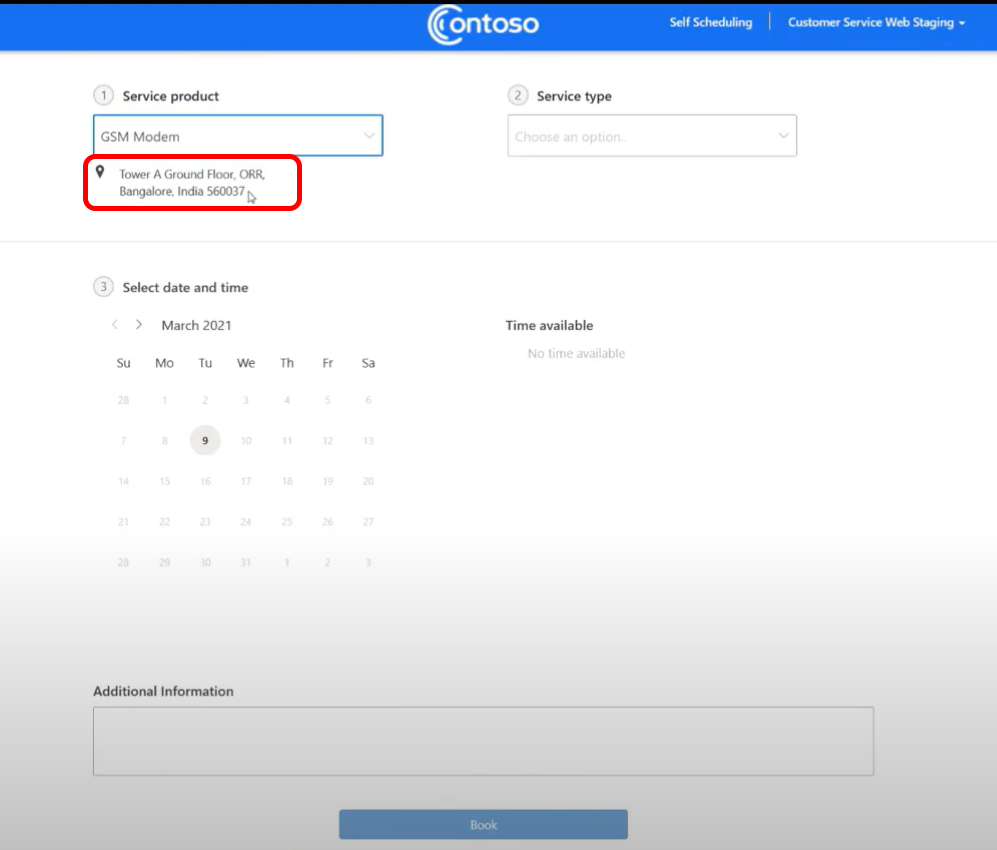
Self Scheduling Portal

In this new portal the Functional Location is displayed next to the affected Customer Asset for which you are Scheduling a Service Call/Technician:

Source: https://youtu.be/W4SKfynrjXU?list=PLLqieRfraDcoTcFSM8AbHmmNl8JbLRAU6&t=5291

Closing Words

Even if there are still some things to consider and improve, in general this is a very great addition to overall Field Service functionality as many Field Service organizations have a need for a deeper structuring of their locations. Servicing industry clients regularly needs more specific information for the field tech about where to go than simply the main Service Account address.

We even had a need to create graphical inhouse maps of floors and rooms to make transparent where exactly the work has to be done.

The much improved flexibility that comes with Functional Locations can be used for rental services or large machinery, which regularly change places (like construction machines, trains, ships, and similar).

Also I think the long standing problem of a Return & Repair process could be addressed with a Functional Location similar to a “Repair Warehouse”.

A great combination is the new ability to “Disable Customer Asset Validation” which turns off the necessity that a Customer Asset handled during a Work Order needs to belong to the Service Account of the Work Order.

More information:

18 Min. introduction Video by MS Field Service Team: https://www.youtube.com/watch?v=UCjyEKH0qFg

Our D365 Goddess Dian Taylor:
https://d365goddess.com/dynamics-365-2020-release-wave-2-part-4/

And of course Microsoft Docs (thanks to Dave Clark & Dan Gittler):
https://docs.microsoft.com/en-us/dynamics365/field-service/assets-functional-location

Share it on

Knowledge Articles for Field Service

  • was available for a long time for Customer Service / Cases
  • now available for Field Service, also offline
  • rich text including pictures, hyperlinks etc.
  • Pictures aren’t available offline [improve@microsoft]

Directly available in Field Service menu now:

  • can be associated to Cases, Work Orders, Customer Assets, Products & Incident Types
  • Knowledge Articles are taken over from a Case into the Work Order, if the Work Order is created out of that Case
  • also if Knowledge Articles are associated with a Customer Asset and/or Incident Types, Knowledge Articles are automatically available at the Work Order

And remember: if you have a Portal, your Knowledge Base is thought to be exposed to your customer base from there as well.

Sources:

Microsoft: https://youtu.be/W4SKfynrjXU

Share it on

Mobile Offline Work Order Report

There is an OOB Work Order Report which can be generated even offline by the mobile application.

It contains the signature of the customer captured via the mobile device. The outcome is a PDF that can be attached to a Work Order.

It can also be sent out to a customer by email, however – of course – online is required for that mail.

Source: https://youtu.be/W4SKfynrjXU?list=PLLqieRfraDcoTcFSM8AbHmmNl8JbLRAU6&t=3861

To adjust the content an dformat of this Work Order Report (PDF Output) the sistem integrator has to adjust a PCF-Control using Visual Studio Code.

An alternative I think is still to use “kind of old school but proven” DocumentsCorePack (DCP) report (highly and easily customizable via MS Word) and let the report be generated when back online via the DCP-Server.

The big question, as this was a weakness in the former mobile signature process where the signature was stored as a picture file attachment within a Note, how does the new mobile app handle the storage of the signature…

It looks like it is stored as a base64 field directly on the Booking:

That means for tools like DCP (or Power Automate) that they have to “interpret” this file format if one wants to use these for a creating a report using the signature.

Share it on

Microsoft Inspections

Installation

When trying to install the Preview of Microsoft’s Inspections by following this manual:

https://docs.microsoft.com/en-us/dynamics365/field-service/field-service-preview

when executing the command from Step 5:

Get-CrmFlights -ApiUrl $url -Credential $cred

I got an error explaining that the module “Microsoft.Xrm.OnlineManagementAPI” could not be loaded. At line:1 char:1.

So I executed

Set-ExecutionPolicy -ExecutionPolicy AllSigned -Scope Process
which only allows an execution of signed scripts for this one PowerShell session.

Everything else worked fine and I got these solutions in the end:

Latest Field Service Version now: 8.8.28.50. Without Preview it was 8.8.23.24

Creating an Inspection questionnaire

Apart from some other data types you can use Entity Lookups:

For Number fields you can directly set a possible number range:

Files and Photos can be attached by users:

You can upload more than one attachments to the same File type question.

I like the way how Input place holder text can be provided:

Also the Other option is great. It shows a textbox only if the Other option was chosen (available for Dropdown, Checkbox and Radiogroup):

Great Preview functionality of the questionnaire is directly available from the editor:

Logic in Inspection Questionnaire

Basic Logic like show/hide or “make required” can be implemented:

Of course you can have more than one Logic definitions:

However what immediately came to my mind was the missing possibility to evaluate data input against other CDS/CRM data.

So let’s say I want to compare a date provided by the person filling in the questionnaire whith a date that is available on a Customer Asset record that is related to the Service Task or Questionnaire, how can we do that?

My first impression is that there is not yet any possibility like that available right now. It would be great if Microsoft can provide something similar to Workflows or Calculated Fields to provide some related record data here for display as well as for validation purposes [improve@Microsoft].

Even if you want to use the provided lookup for a logic it seems like you would need to provide a GUID since there’s no lookup in the Logic editor.

Also operators like “greater that” might not make any sense when comparing records/ GUIDs. So MS still needs to exclude them from possible options here [improve@Microsoft].

Service Task

Than you create your Service Task Type containing the Inspection questionnaire:

The questionnaire even gets displayed on the Service Task Type Form.

On your Work Order Service Task you’ll get another new field “Result”:

Also see the Clear Responses button in the ribbon bar. All responses are reset/deleted by clicking it.

Also the questionnnaire is displayed here and you can directly start filling it in here in your Browser.

Entity lookup: only records where the User has privileges for are displayed. Keep in mind: only “Name”-field of related record is displayed. Would be great if in future versions it can act like an usual lookup field in D365CE [imporve@microsoft].

Once published, an Inspection can’t be unpublished and edited anymore [however this is on Microsoft’s roadmap], but from the main menues Lnspection list you can highlight and than copy the Inspection and create a new version of it this way:

Mobile

In Mobile (Field Service Mobile Power App) it would look similar to this:

(Picture by Microsoft)

Microsoft’s Inpections als work on Resco based Field Service Mobile. To use it you have to donload a new Woodford Mobile Template, see/download from here: https://docs.microsoft.com/en-us/dynamics365/field-service/inspections#perform-inspections-on-mobile

(Picture by Microsoft)

Run Power Automate Flows triggered by Inspection Responses

See here the video published by Microsoft, even if it is showing the deprecated D365 connector:

Roadmap

  • pages: allow to add your questions to an inspection “page” so that you can also skip whole pages
  • GA October 2020

Attention

According to Microsoft’s docs-article, Inspections cannot be exported and imported to other environments. Hope/expect that will improve as well [improve@Microsoft].

Sources / more information:

Articles by Dian Taylor (MVP) including Video recordings:

Manuals by Microsoft:

Installation manual (for preview version): https://docs.microsoft.com/en-us/dynamics365/field-service/field-service-preview

Comprehensive User manual including explanation of Power Automate triggered by Inspection responses: https://docs.microsoft.com/en-us/dynamics365/field-service/inspections

Share it on

Deprecation of Resco based Field Service Mobile App

Microsoft has announced the deprecation of the current Resco based Field Service Mobile App by June 2022.

From June 2021 on new Field Service setups have to use the new Field Service Mobile App which is fully made by Microsoft and in fact is a Model Driven App as we know it today.

The new App can be tested from Field Service Version 8.8.22.x onwards. In mobile App Stores (i.e. Google Playstore) the new app is called “Field Service Mobile (2020)” as of today.

There are some offline capabilities including sync filters already but it looks like offline logic implementation is not as easy and comprehensively possible as is it with the Resco based Field Service app. Also many other functionalities are currently missing, but Microsoft promises to catch up.

Some things that are still missing are: Push notifications, Geofencing and Location Auditing, Reporting, IoT Alerts, Remote Assist and MS Intune.

Interesting is also a new control called “Form Component Control”, which can be used to embed a Work Order form into a Booking form:

Will this be a general new feature which can be used for all other forms as well? – It looks like!

Resco will continue to evolve its Mobile Application Development Framework and will also continuously provide new features and mobile solutions. Resco already offers different mobile solutions and templates (i.e. an advanced Field Service template, Sales template, Route Planning, Inspections) that are working perfectly together with Dynamics 365 and will continue to do so after June 2022. That means by the time Microsoft catches up with current Resco technology there will be new functionality available for Users that stay with Resco as well. On the other hand also Microsoft is rapidly growing its Power Apps capabilities.

For now the direction to go would be for more sophisticated requirements and larger implementation projects Resco will probably be the better fit. For more simple / standard requirements Microsoft’s model drivel app could be worth to consider.

To sum that up – it will not be end of development for the excellent Resco Field Service mobile technology – it will rather be a separation between the Microsoft FS Mobile App and the Resco FS Mobile App. Of course we’ll eventually have to pay Resco separately if we want to use their enhanced solutions. But competition is generally good for the market and customer segmentation has always made sense.

Source and more information:

https://docs.microsoft.com/en-us/dynamics365/field-service/mobile-2020-power-platform

Share it on

FS Mobile: Remove Signature from Notes

On Resco for Dynamics or Field Service Mobile Client you by default have this (in my opinion unnecessary) Signature field on every Note form.

Note Form with Signature panel

So you might ask yourself why do you need the huge Signature area on each and every Note form. Usually it should be enough to capture Notes only on Work Orders and maybe for some special (custom) forms/processes. It confuses the End User if all he wants is adding an attachment or even only a text Note.

So what you can do is removing the Signature area by a simple On Can Execute rule on the Note form:

On Can Execute Command on Note form

After you have configured this you would not see the Signature panel on a Note form anymore and also not the Signature command from the upper right burger menu of the Note form.

Note Form without Signature panel
Note menu without Signature command

You can still configure one or more Signature sections for each of your forms as you already have it OOB on the Work Order form in FS Mobile.

Add Signature Tab to a Form

  1. in Woodford, go to Entity where you want to add the Signature
  2. click “Add Media”
  3. provide Name
  4. Select “Capture Signature” and “Clear”
  5. Optional: Provide “Required for Status”. Example: Status “Approved” only possible with Signature
  6. Subject: Title of the Note

Similarly you can apply this for Photos, Videos, Files, … You could also have one Tab for Signature capturing and another Tab for Photo and/or Video capturing. Or collect multiple Signatures on one form by having different Tabs for that.

More information & sources

More details/inspirational source of how to add a Signature to a Form:
https://red365ce.wordpress.com/2015/03/10/resco-mobilecrm-adding-a-digital-signature-to-forms/

For more information about On Can Execute, which enables you to conditionally hide or show commands/buttons in the upper right corner of forms, see here:
https://www.resco.net/woodford-user-guide/#__RefHeading__5865_1627906509

Share it on

Standard Setup Tasks Field Service Mobile

Always, when I setup a new Field Service Mobile, there are some steps I go through to ensure, everything is initially working in a comfortable manner.

Surely some of the steps aren’t required but have proven to be my best practice for new instances.

  1. create Resources and ensure that they are enabled for FS Mobile
  2. install Woodford
  3. install the latest Project Template from here and make a derivate out of it in which you perform all following mobile customizations
  4. in Woodford, go to plugins and activate the most important Delete plugins: Work Order, WO Product, WO Service, WO Service Task, …
  5. in your Project Template derivate, go to Configuration and set Save Password to true

6. edit the Sync Filters to also include data from the past (1-2 weeks) for: Work Order, WO Product, WO Service Task, WO Service, WO Incident, Resource Booking.

7. switch the default Booking View Layout from Calendar to List. To do so, go to Home=>Bookable Resource Bookings=>Properties=>Properties=>Initial Control=>switch from Calendar to List

8. activate your 30-days Trial of Woodford here: https://docs.microsoft.com/en-us/dynamics365/field-service/activate-fs-mobile-app-license

Share it on

Embed Forms Pro Survey into Field Service Mobile

Here is a nice article by Thomas Dayman that gives a short overview of how to embed a Survey Questionnaire created with the new Microsoft Forms Pro into the Field Service Mobile app.
The approach is to create an Offline HTML file where Thomas provides a sample code snippet for, and embed that via iFrame into a Form in Woodford.

Compared to Resco’s new Inspections the Forms Pro integration doesn’t support offline scenarios. Resco Inspections comes with additional licence cost whereas for Forms Pro it is still not clear how the licencing will look like.

Microsoft Forms Pro embedded in Field Service Mobile
Share it on

Activate CE Field Mappings in Field Service Mobile

Say you add the Contact subgrid into your Account form on Field Service Mobile because you’re expecting your Field Agents to also capture new Contacts and they are first searching for the Account first instead of adding the Contacts directly from Home=>Contacts.

Now if you tab on “+” at the top of the Contacts subgrid on the Account form the “New” form for Contacts opens.

And now the difference here is: if you leave the setting from below in its standard configuration as it comes out of the box, your address fields will stay empty so that for the new Contact you have to fill everything in manually.

But if you change the setting “Use Entity & Attribute Map” to “true”, the address fields on a new Contact form are automatically populated from the same fields on the Account form were you had started your journey.

Resco Field Mapping
Share it on

Mobile: Only load Customer Assets for which you have Work Orders

If you have too many Customer Assets in your Dynamics 365 database and you don’t want to have all of them offline available in your Field Service Mobile client you can set up a Sync Filter to do that.

Open Woodford=>Customer Asset and click on Sync Filter.
Than set it up like this:

Woodford Sync Filter Customer Assets

After saving the filter don’t forget to set the Incremental Linked SyncFilter (on top of the field list) to Enable:

If you want to go deeper, you can read here what this flag does:
https://www.resco.net/woodford-user-guide/#__RefHeading__5819_1627906509

Share it on